Apex Install and Wiring
This article contains detailed instructions about setting up and installing an Apex sensor.
Video

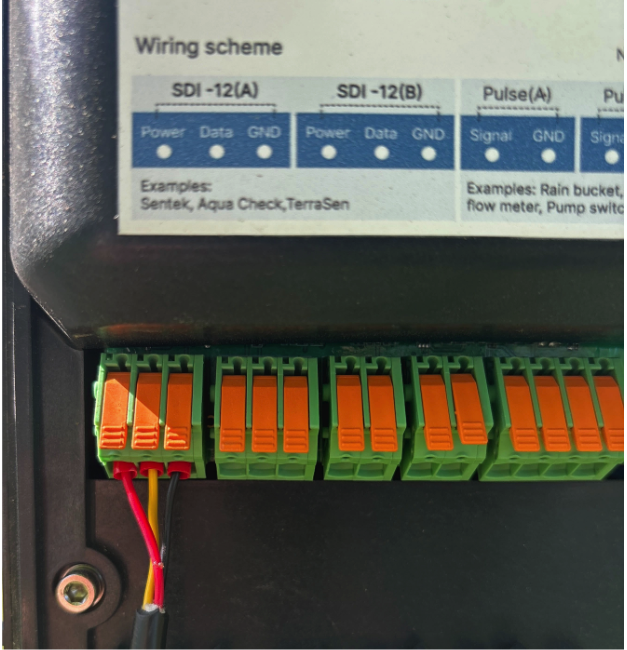
Apex Wiring
Red = Power
Yellow = Data
Black = Ground
Required Materials
- Apex sensor
- Sensor cable
- CropX TD2 Telemetry device - (Check compatibility if TD2 Serial number is less than G202230)
- Installation tools (auger and tripod)
- Cable protection (optional: conduit or loom)
- Water spray bottle
Before You Begin
Ensure the following prior to installation:
- Sensor and cable are free of visible damage
- Installation location is representative of the desired irrigation zone
Installation Procedure
1. Unbox and Inspect
- Remove all components from packaging
- Inspect:
- Sensor housing for damage
- Cable for cuts, kinks, or abrasions
- Connector for dirt or debris
- Avoid tightly coiling the cable
2. Select Installation Location
- Choose a location representative of the crop/root zone
- Avoid:
- Field edges
- Low spots or unusually wet/dry areas
- Clear surface debris before installation
3. Prepare the Soil
- Create a pilot hole using the CropX Apex auger and tripod ONLY
- Ensure hole depth matches intended sensor placement
4. Install the Sensor
- Insert the Apex sensor vertically into the soil
- Ensure:
- Full soil contact along the sensor body
- No air gaps around the sensor
5. Route the Cable
- Route cable toward the telemetry device
- Follow best practices:
- Avoid sharp bends and pinch points
- Keep cable off the ground when possible
- Use protective conduit if needed
- Leave a small amount of slack in the cable
6. Connect to Telemetry Device
- Attach the sensor connector to the appropriate port and wiring configuration as pictured above
- Ensure:
- Secure, tight connection
- Connector is clean and dry
7. Configure in Software
- Begin the install in the CropX app
- Confirm:
- Sensor is detected
- Correct port/channel assignment
- Assign or label the sensor as needed
8. Verify Operation
- Confirm real-time data is being received
- Validate readings: How to tell if readings are right for my soil
- Moist soil → higher readings
- Dry soil → lower readings
- If readings are missing
- Check connections
- Verify system configuration
9. Finalize Installation
- Secure cable using stakes or clips
- Optionally bury cable for protection
- Mark sensor location in tall crops
Best Practices
- Install in representative soil conditions for accurate data
- Ensure firm soil contact—this is critical for performance
- Protect cables from equipment, animals, and environmental damage
Related Articles
Apex Specifications
Apex Sensor Technical Specifications The CropX Apex sensor measures three key soil parameters to help monitor crop and irrigation conditions: Volumetric Water Content (Soil Moisture) Soil Pore Water Electrical Conductivity (ECpw) Soil Temperature ...